$ sudo nmap -Pn -sT -p- --min-rate 10000 10.10.11.214 -oN nmapscan/portscan.txt
Starting Nmap 7.93 ( https://nmap.org ) at 2023-06-07 17:19 CST
Nmap scan report for 10.10.11.214
Host is up (0.37s latency).
PORT      STATE SERVICE
22/tcp    open  ssh
50051/tcp open  unknown
Nmap done: 1 IP address (1 host up) scanned in 84.48 seconds

$ sudo nmap -Pn -sU -p- --min-rate 10000 10.10.11.214 -oN nmapscan/uportscan.txt
Starting Nmap 7.93 ( https://nmap.org ) at 2023-06-07 17:21 CST
Nmap scan report for 10.10.11.214
Host is up (0.40s latency).
Not shown: 65534 open|filtered udp ports (no-response)
PORT      STATE  SERVICE
50051/udp closed unknown
Nmap done: 1 IP address (1 host up) scanned in 16.39 seconds

$ sudo nmap -Pn -sT -sCV -O -p22,50051 --min-rate 10000 10.10.11.214 -oN nmapscan/servscan.txt
Starting Nmap 7.93 ( https://nmap.org ) at 2023-06-07 17:29 CST
Nmap scan report for 10.10.11.214
Host is up (0.63s latency).
PORT      STATE SERVICE VERSION
22/tcp    open  ssh     OpenSSH 8.2p1 Ubuntu 4ubuntu0.7 (Ubuntu Linux; protocol 2.0)
50051/tcp open  unknown
Aggressive OS guesses: Linux 4.15 - 5.6 (92%), Linux 5.0 (92%), Linux 5.0 - 5.4 (91%), Linux 5.3 - 5.4 (91%), Linux 2.6.32 (91%), Linux 5.0 - 5.3 (90%), Crestron XPanel control system (90%), Linux 5.4 (89%), ASUS RT-N56U WAP (Linux 3.4) (87%), Linux 3.1 (87%)        No exact OS matches for host (test conditions non-ideal).
Service Info: OS: Linux; CPE: cpe:/o:linux:linux_kernel
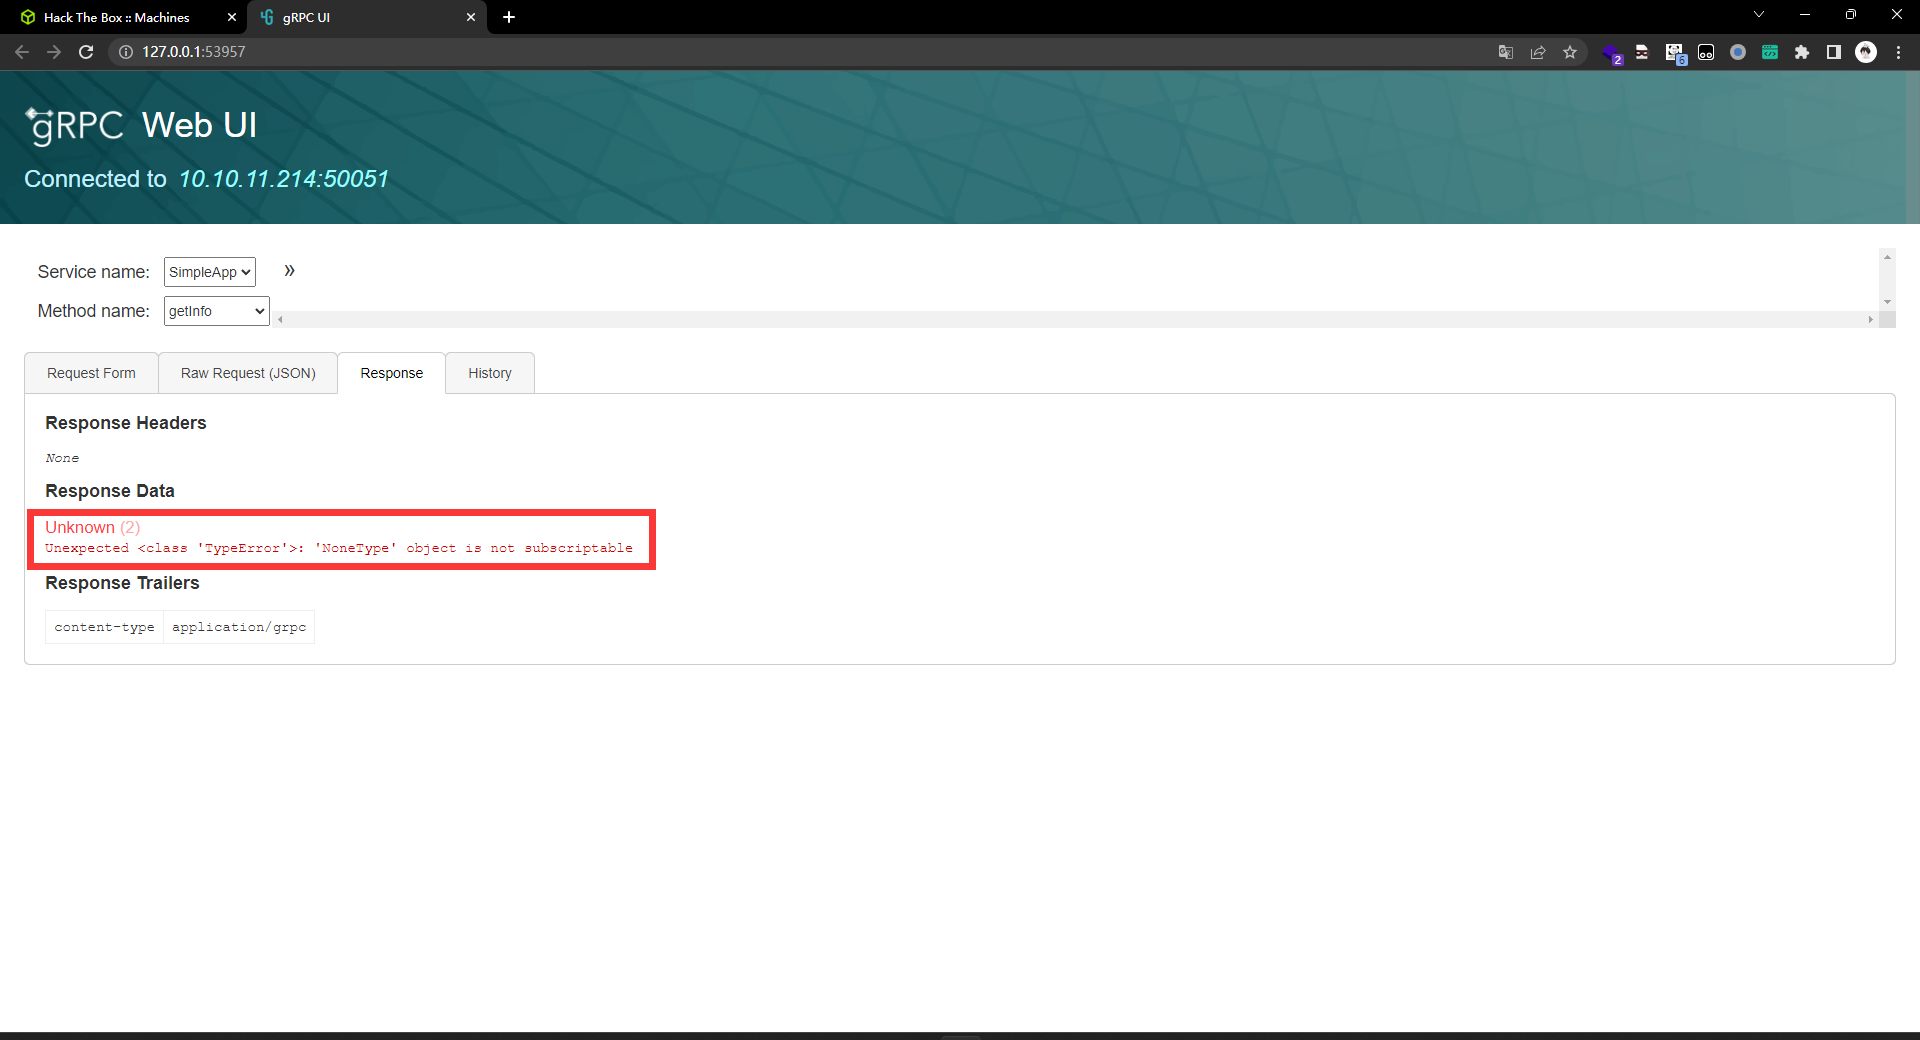
Response contents: { "message": "Your id is 33." }
Response trailers received: token: b'eyJ0eXAiOiJKV1QiLCJhbGciOiJIUzI1NiJ9.eyJ1c2VyX2lkIjoiYWRtaW4iLCJleHAiOjE2ODcxMTkxMzV9.kZacDAWwQJFdTb420SmvGJjerGN_qElGIqxc5Djx9SU' Sent 1 request and received 1 response
$ ssh sau@pc.htb # HereIsYourPassWord1431 sau@pc:~$ uname Linux sau@pc:~$ uname -a Linux pc 5.4.0-148-generic #165-Ubuntu SMP Tue Apr 18 08:53:12 UTC 2023 x86_64 x86_64 x86_64 GNU/Linux sau@pc:~$ id uid=1001(sau) gid=1001(sau) groups=1001(sau) sau@pc:~$ sudo -l [sudo] password for sau: Sorry, user sau may not run sudo on localhost. sau@pc:~$ whoami sau sau@pc:~$
注释
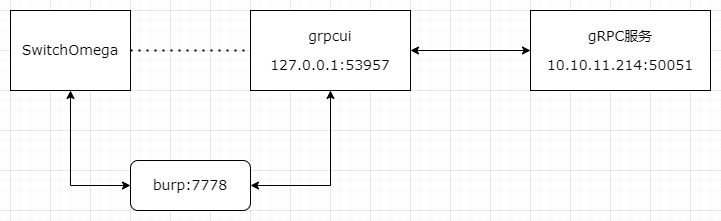
hosts 文件修改
/etc/hosts 文件是一个用于映射 IP 地址和主机名的本地配置文件。它可以用来在本地系统中手动指定IP地址和主机名的对应关系,从而绕过 DNS 服务器进行主机名解析——在系统进行 DNS 解析之前,会首先去 hosts 文件中查找。在 hosts 文件中,如果能够找到被访问域名的 IP 地址,就不会再向 DNS 服务器发起请求。
该文件的格式如下:
1
2
3
4
# IP hosts_name Alias
# example
127.0.0.1	localhost
127.0.1.1	K4.	K4
gRPC is a modern open source high performance Remote Procedure Call (RPC) framework that can run in any environment. It can efficiently connect services in and across data centers with pluggable support for load balancing, tracing, health checking and authentication. It is also applicable in last mile of distributed computing to connect devices, mobile applications and browsers to backend services.
gRPC是 Google Remote Procedure Call 。gRPC 是一个开源的 RPC 框架,用于创建可扩展和快速的 API 。它使网络系统的开发以及 gRPC 客户端和服务器应用程序之间的开放通信成为可能。gRPC 已经被一些顶级科技公司所接受,包括谷歌、IBM 、Netflix 等等。gRPC 框架依赖于 HTTP/2 、协议缓冲区等尖端技术栈,以实现最佳的 API 保护、高性能远程过程调用和可扩展性。
The 'address' is only optional when used with 'list' or 'describe' and a protoset or proto flag is provided.
If 'list' is indicated, the symbol (if present) should be a fully-qualified service name. If present, all methods of that service are listed. If not present, all exposed services are listed, or all services defined in protosets.
If 'describe' is indicated, the descriptor for the given symbol is shown. The symbol should be a fully-qualified service, enum, or message name. If no symbol is given then the descriptors for all exposed or known services are shown.
If neither verb is present, the symbol must be a fully-qualified method name in 'service/method' or 'service.method' format. In this case, the request body will be used to invoke the named method. If no body is given but one is required (i.e. the method is unary or server-streaming), an empty instance of the method's request type will be sent.
The address will typically be in the form "host:port" where host can be an IP address or a hostname and port is a numeric port or service name. If an IPv6 address is given, it must be surrounded by brackets, like "[2001:db8::1]". For Unix variants, if a -unix=true flag is present, then the address must be the path to the domain socket.
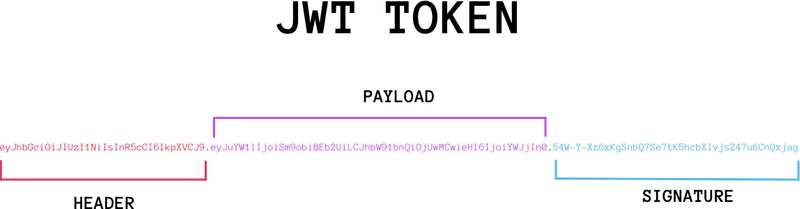
JWT 定义
用户认证机制
一般用户认证机制:
用户向服务器发送用户名和密码。
服务器验证通过后,在当前对话(session)里面保存相关数据,比如用户角色、登录时间等等。
服务器向用户返回一个 session_id ,写入用户的 Cookie。
用户随后的每一次请求,都会通过 Cookie,将 session_id 传回服务器。
服务器收到 session_id ,找到前期保存的数据,由此得知用户的身份。
JWT 认证机制
JWT(JSON Web Token)是一种用于在网络上进行安全传输的开放标准(RFC 7519)。它是一种基于 JSON 的令牌,用于在客户端和服务器之间传递声明。JWT 通常用于身份验证和授权,可以帮助在不同的系统之间安全地传输信息。